Yesterday, +Jill Van Patten was sick, so I was in the shop by myself for the day. I worked on some more templates, then started shaping the footboard legs. I start by taking the milled lumber for the legs, then I screw the templates to that material. I carefully locate the screw location so that the screw holes will be covered by one of the 100 or so ebony plugs that will be added once the footboard is glued up and sanded. I then trace the outline of the template with a permanent marker, remove the template, and rough cut the material on the bandsaw. Then I screw the template back on and use a flush trim bit in the router table to make the leg perfectly mirror the template.
The joint where the legs meet the top rail on the footboard and headboard is a splined miter joint. The first step is to cut a perfect 45 degree miter on both the legs and the top rail. This must be done before the legs or top rail are shaped, so that we have nice flat and square faces to register the 45 degree angle. At this point, the top rail is oversized, which is fine for now. Right now, we're just getting the angle correct.
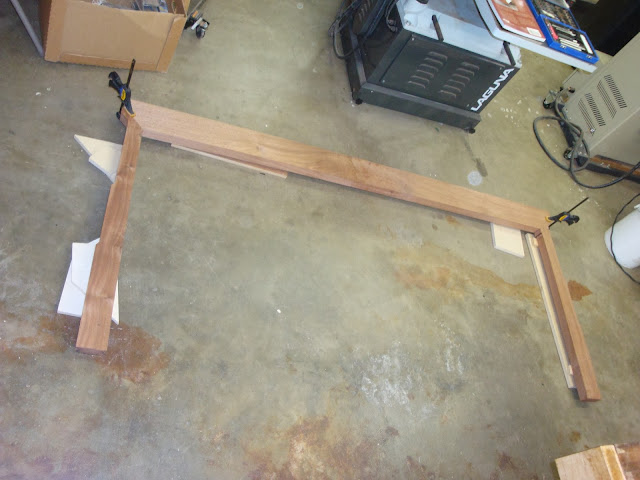
Here's a shot of how the legs and top rail of the footboard will join together.
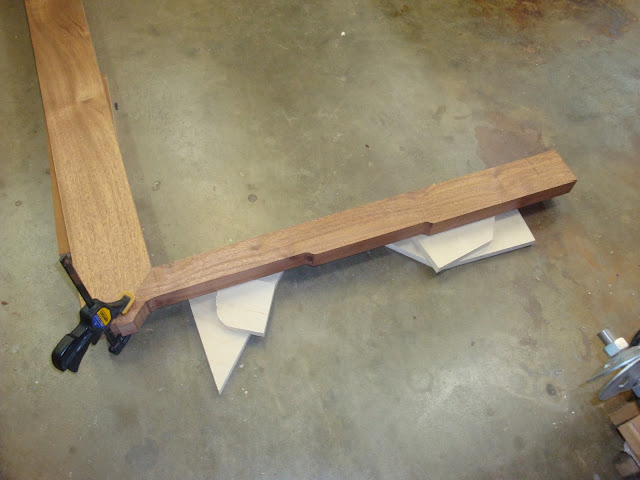
Here's a closer picture of the joint between the top rail (which is on the left) and the left leg (which is on the bottom). You can see some of the shaping detail on the outside portion of the leg (the very bottom in this picture). This detail is an example of what took so much time in getting the templates right.
In the above picture, that flare-out at the joint is not permanent. I put that there because it's the only way to clamp the rail and the leg together during glue-up; once the joint is glued, I'll cut that off. You'll see that better when the time comes in a future post (hopefully not too far into the future).
Today, I tackled one of the most physically and logistically challenging tasks on the bed. The bottom rail on the footboard is a ginormous piece of material. The finished board is 10-1/8" wide, 1-1/2" thick, and 67-5/8" long. I only have one board in my lumber storage that is big enough for this beast, and it's a monster. 13" wide, 2-1/4" thick, and nearly 10 feet long. Keep in mind that mahogany is much heavier than pine or Douglas fir. Milling and jointery on something this large tests the limits of my tools and the physical limits of my arms. Milling this monster board flat, square, and to final dimensions took me nearly five hours. I start by rough-cutting the material oversized. I begin at the miter saw.
I have a 12" sliding compound miter saw, and it is just barely has the cutting depth to handle this board. Note the stand supporting the left side of the board, and the hold-down that normally goes unused got some exercise holding this board down during the cut. Just setting everything up for this simple cut took about 10 minutes. Maneuvering the material is a huge hassle.
Next, I trim the board to a slightly oversized width at the bandsaw. Remember that the material here is 2-1/4" thick. When I brought the board over to the bandsaw, my little 1/8" bandsaw blade ran and hid. So I installed a 1" resaw blade which was better suited to the task. I had to set up roller stands on both the infeed and outfeed side of the bandsaw, because there's no way I could hold this board while making the cuts.
That 18" bandsaw is a large saw, weighing over 500 lbs. But the board makes it look a bit undersized. It also makes my garage look undersized -- I had to open the door to have room to feed the board through the saw.
Just as I started feeding the board through the saw, I noticed a staple in the end of the board, right where the blade would have cut That's a quick way to ruin a $150 bandsaw blade. There's no good reason to put metal staples in the end of the boards, and it frustrates me when lumber retailers do that. And by the time they paint it all blue, it's hard to see the staples. Plastic staples would be perfectly suitable, safe, and do less damage to blades.
So the board presented significant challenges for my poor bandsaw. But ultimately, as between the board and the saw, the saw won:
So now we have the board rough-cut to slightly oversized dimensions.
Now it's time to start getting it flat, square, and to finished dimensions. First step is the jointer. My fairly large 12" jointer just barely has the capacity to face joint an 11" wide board. After a few passes, you can see some areas starting to flatten and other areas where we still have sawmill marks:
And subsequent passes lead to a more finished surface:
Now we see the final surface of a very large board:
About halfway through the milling process, the sawdust from this board had filled up the 15 gallon drum of my dust collector.
By the time I finished at the planer, the 15-gallon drum had filled up a second time. More than half of that enormous board is now sawdust, and by the time I'm done with it, the finished board will be about 1/3 the weight of the original monster.
My planer has a spiral cutterhead, which leaves a nearly flawless finish. But to make sure the final surface is perfect, I save the last .015" for my wide belt sander. This is one of the best tools ever invented. I run through a couple passes on each side with 100 grit sandpaper, and in about 2 minutes I save myself hours of sanding down the road. The pic disappeared from my camera, but I'll take another for a future post.
The last milling steps were to joint one edge of the board on the jointer and then cut it to width at the tablesaw. Unfortunately, the board had a large enough crown that it was taking a long time to edge-joint at the jointer. And this board is still heavy enough that maneuvering it on the jointer, picking it up, carrying back to the infeed table on the jointer, and repeating, was giving me quite a workout. So I clamped it in my workbench and trimmed it with a handplane.
After a little work with the handplane, I only had 3 more passes on the jointer before the edge was perfectly flat and square. One run on the tablesaw, and it was finished.
This process took roughly 5 hours. Each cut goes fairly quickly, but for each cut, it takes quite a bit of time to set up the equipment, the support stands, and all the other things you have to do to make your tool handle this large of a board.
Enough milling for one day. On to more interesting things, like joinery. Classic woodworking wisdom says to do your joinery in the morning, because you get a bit tired and careless in the afternoon. So today I pushed my luck, and fortunately didn't do any damage. The legs and bottom rail will connect by a very large mortise and tenon joint. I begin by cutting the tenons using my multi-router. The multi-router is a machine that allows precise x/y/z movement against a router bit -- in this case, a 1/2" bit that I'm using to cut a 1/2" x 6" mortise in the footboard legs.
I normally use the multi-router to cut tenons as well. I began cutting a tenon on the bottom rail. However, it turns out the rail is way too big for my multi-router, and I couldn't finish the tenon in the usual way. So I closed up shop and I'm taking the evening to contemplate other ways to cut the tenon. There are many options, but they each have their own complications when you're dealing with material as large as the rail. I'll probably go with some combination of the multi-router and my tablesaw, but we'll see.
Jill spent the afternoon making ebony plugs. The plugs are small, decorative ebony cubes that are pillowed (rounded) on the top and chamfered on the bottom, and each one will be inlayed into a square mortise in the bed. There are over 125 ebony plugs on the bed. They each must be sanded, cut, and polished by hand.
Tomorrow, more joinery. And then lots and lots of shaping.


No comments:
Post a Comment