Monday, June 13, 2016

Voicing the back plate and soundboard

This weekend we finished bracing and voicing the back plates and sound boards.

The purpose of the bracing is to ensure that the very thin pieces of wood hold up over time to the string tension.  Without braces, the guitar would collapse.  However, too much bracing will make the plates too stiff and heavy, which will dampen the sound.  Voicing the guitar is the art of placing and then selectively weakening the braces until the soundboard and back plate are strong enough to hold up over time, but weak enough to respond efficiently to string vibration.

We start by getting the braces glued up in an oversized state.  Then, we shave each brace into a triangular shape (wide base, point at the top).  This removes quite a bit of mass, which is good, because the lighter the plate is, the more responsive it will be.  On the other hand, because we preserve the height of the brace, it remains almost as strong as it was in the first place.  The best of both worlds.  We get to the triangle shape using handplanes and chisels (and a bit of sandpaper).  First, the back plate:


With the back plates voiced, we can glue them to the sides.  We got Josh's glued up today:


Next, the soundboard.  In addition to making the braces triangle-shaped, we also have to selectively weaken the bracing by shortening the braces in places where we want to make the soundboard more flexible and responsive.  Here is a brace on the soundboard called a "finger brace."  (Note how the end of the brace is tucked into the other brace at the end of it, which ensures the brace doesn't come unglued over time.)
 Now, we'll remove material from the brace at the outer edge of the soundboard, which will make the soundboard more flexible around the perimeter.  We'll also remove a lot of the material near the other brace, which will de-couple the braces and make the soundboard more flexible in this area:
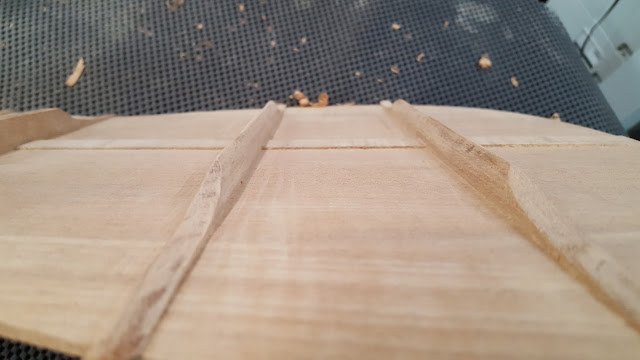
 Finally, we'll give the brace the pyramid shape.  The majority of our original material is now gone. 

 We repeat this process with the other braces in appropriate locations.  The questions of how much material to remove, and from where, are the challenges.  I'm being pretty aggressive on this guitar about making the bracing super light.  It is going to be a smaller guitar, and it will be played with light strings and a lot of fingerstyle and light picking playing.  So it doesn't need as much strength as it would need to hold up if it were a big guitar being played for heavy bluegrass or strumming.  The lighter bracing should give the guitar very good bass response even though it is a small guitar.

To get it right, we do something called "tap tuning."  That sounds fancier than it is.  Basically, you hold the plate in the right spot and then tap on it in the bridge location, listening to how the frequency changes and how rapidly the sound decays.  As you carve away material, the frequency drops, and the decay becomes slower.  Up to a point, this is what you want.

I picked up a new tool to help with the voicing.  One of the challenges voicing the guitar is holding the plate still.  A company called Festool makes a really slick vacuum clamping system that I picked up Saturday, and this really makes it a lot more comfortable to carve the braces.  It has a plate that forms a vacuum between the plate and the workpiece, and then you can rotate the workpiece and lock it stably in any position while you work.  It's very cool.


 Here is the voiced soundboard.  I'll spend an hour tomorrow sanding the braces so they look pretty, although Josh and I are the only ones who will ever see them.



Wednesday, June 8, 2016

Bracing, backs and rosettes

After bending the sides, the next step is to install the neck block and tail block.  These blocks provide a lot of structural strength when the guitar body is all together.  The neck block also houses the joint that keeps the neck connected to the body.


Next, we install kerfed linings around the edges of the sides.  These linings provide additional surface area for gluing the soundboard and back. 


We also install vertical braces on the side.  These braces guard against the risk that, if someone drops the guitar and cracks the side, the crack could travel up the sides farther.  The braces are designed to stop the crack from travelling very far, so that it's easier to repair.


Next, we use the molds to trace the outline onto the back and side materials, then cut them to rough shape on the bandsaw.

The back gets a thin strip of cross-grained mahogany up the seam to guard against cracks at the joint.  I glue these on with a "go-bar deck," which consists of fiberglass rods bent between a piece of plywood up top and the back plate down below.


All of the gluing is done with the back plate on a 15' radius dish, which is the shape that the back will ultimately have.

I glued up the rest of the braces on the back as well using the same process, but didn't take pictures. 


Now, I'll make the rosette and install it on the soundboard.  I'm making this rosette from a piece of very figured mahogany I had lying around.  I use a special rosette cutting tool on the drill press, which has a couple blades that spin around and cut out the material in a circle.  I also cut the channel for the rosette in the soundboard.


I coat the soundboard in the rosette area with shellac to protect the wood from the cyanoacrylate (Super Glue) that I'll use to glue in the rosette.  The cyanoacrylate will stain the wood an ugly color if unprotected.


I cut the rosette channel big enough that I can also inlay very fine strips of black/white/black purfling material that I bought from a luthier supply house.  I squish the purfling into the channel on both edges of the wood rosette, and cut it to length with a sharp chisel.


 Next, I run the soundboard through the wide belt sander and sand the rosette flush with the rest of the soundboard. 


Somewhere in there, I cut out the soundhole, but apparently I didn't take pictures of that.

Friday, June 3, 2016

Side bending

The most common question people ask me about building guitars is about how I get the sides shaped like a guitar.  Well, if you have the patience to get through this post, you'll get a video of how it happens.  Lots of progress to post first, though! 

The molds are complete -- glued up, assembled, and a few coats of lacquer. The lacquer is just to protect the MDF from moisture. Moisture makes MDF swell a lot and ultimately crumble apart. These molds will see their fair share of moisture, as you'll see later in this post. Here's what one of the finished molds looks like, with the spreaders in place.  The spreaders will squish the sides against the mold while I'm working on them.  I made two molds and sets of spreaders, so Josh and I can be working on the guitars at the same time.


Next, I made a 40' radius dish.  A radius dish is a disc (this one is about 1-1/2" thick, 23" in diameter) with an inverted dome cut into the top.  The dome has a 40' radius.  Imagine an enormous sphere that is 40' in diameter, lowered into my radius dish, and that is the shape I'm going for.

The purpose of the radius dish is to help me put a 40' radiused dome on the top of the guitar.  Even though these will be traditional "flat top" guitars, flat top guitars aren't really flat on the top.  They are mostly flat.  If they were all the way flat, they would break.  Whenever the humidity decreases, the wood on the top would try to shrink, and since it is glued to the sides, there is no way for a flat top to shrink without splitting.  A slight dome gives the top room to shrink (and, in the process, flatten a bit) without cracking when the humidity decreases.   It is also quite a bit stronger than a flat top.  I've always used a 25' radius for my guitar soundboards in the past, but Martin uses a 40' radius, and since Josh wanted a very Martin-esque guitar, I'm making a new radius dish.

I've made radius dishes in the past using a router with a set of arched guides and a lazy suzan to spin the dish while the router goes to all the right places.  It's too complicated to explain, and very messy.  But today, I have a CNC machine, so it's a pretty simple process.  Here's a video of my CNC router cutting the dish, which I think is super cool:


And here's as picture of the finished dish.  The 40' radius is very slight, so the dish looks flat until you put a straightedge on it:


Well, that's enough mold-and-jig building.  Time for the real fun to begin.

I build my guitars from scratch.  Quite literally, I buy nearly all of my material as rough-sawn lumber from a local lumber yard.   You have to be very careful to pick out lumber with the right grain orientation, which is important for strength and stability.  But if you know what to look for, there's plenty out there.  Alternatively, you can buy specialty tonewood from some of the luthier supply houses.  "Tonewood" is wood that you buy from a luthier supply house that costs 5-6 times what you would pay for "normal wood" at a lumber yard.  There really isn't any other difference.

These guitars were inspired by an all-mahogany Martin that Josh and I saw at a local music store, so Josh wanted to make these guitars from African Mahogany.  We'll use that for the soundboard, back, sides, and neck.  (Most everything.)  Here's the raw lumber:

All of this gets resawn on my bandsaw to very thin slices.  Starting with the center board in the picture above, which will be for the sides, I begin by jointing one side perfectly flat on my jointer:


We plane the other side perfectly flat and parallel to the first side, using the planer:


Then I slice it up on the bandsaw:


Now, each slice is about .190" thick.  The sides need to be thinned to roughly .080" for them to bend without cracking.  I thin them on the wide belt sander:


Next, I stack the super-thin sides with popsicle sticks in between them, and then put a heavy rosewood board on top.  The purpose is to let the sides acclimate to the humidity of my shop now that they have been resawn, and the popsicle sticks create a bit of space between the sides so that the air can flow between them readily.  The heavy rosewood keeps the sides from warping as their moisture content adjusts.

Then I go through the same process with the big piece of mahogany for the backs and soundboards.  I upgrade the popsicle sticks to some bigger sticks to ensure I have good airflow on these larger pieces.


 And now, for the part you've been waiting for.  How to bend the sides.  Having thinned the sides to .080" thick helps, but it will still break if you try to bend it.  So, I spritz it with some water, push the wood against a hot pipe, and let the steam get into the wood fibers.  I keep repeating until I can bend the fibers a bit.  When the fibers are hot and wet, they will bend.  The concept isn't complicated.  But it is finicky.  If you push too hard, it will crack.  If you don't push hard enough, it won't bend.  If you don't wait long enough for it to get hot before bending, it will crack.  If you let it get too hot for too long, it will "case harden" and become impossible to bend.  If you get it too wet, it will ripple in a nasty way.  If you don't get it wet, it may case harden before it bends.  There's lots that can go wrong, but with some practice, it just bends.

  And so, here are the videos.  The first video shows me just beginning to bend.


 This next one is a bit longer.  Bending sides takes some time.  I have to bend it, compare the shape to the mold, bend some more, and keep going until it is close enough that I can clamp it into the mold.  Some people are faster than me, but my sides come out pretty nice.  I think this side took me about 20 minutes overall to bend until I had it ready to clamp into the form.  (The video doesn't show the whole thing.)  Don't feel like you have to watch the whole thing, but it is kinda therapeutic.


Here are some pictures of the bent side in the mold.  Those spreaders I made press the side firmly against the mold.  The sides will sit there for a day or two to dry and then get used to their new shape.  (You can see in the first and third pictures below that some areas are darker because they are still wet, while others are lighter because they are dry.)  I made the outer edge of the spreaders .09" smaller than the inner edge of the mold, so the spreaders match the inside edge of the sides when the sides are pressed firmly against the mold.


And that's how you get wood into the shape of a guitar.